#1 Let’s Get Started! [5 Points]

Please title your post: My First Blog Post


Learning Targets:

Students will be able to:

  • create their own personal blog site
  • customize their blogs
  • navigate the blog
  • become familiar with the various menus
  • write and publish their first blog post

Students will create their own blog page through: www.edublogs.org

Choose the “Sign up for a Free Blog” option then proceed to the following steps:

  1. Username= In all lowercase letters enter the first letter of your first name followed by your last name i.e. dlafata
  2. Password= your ESD password
  3. Which best describes you?= student
  4. E-Mail= your ESD E-Mail
  5. Site Title= Your Block/Your Class/Your first name capitalized/Your last name capitalized* you do not need to add the underscore to your site title; I placed it in this example to denote that there should be a space there.

Site Title Example: A1 VE Bobby Drake


Students will log into their blog and complete their first blog post. Please give it the title My First Blog Post.  Please use COMPLETE THOUGHTS and SENTENCES to answer the following in a blog post:

  1. How much experience have you had with photography?
  2. What is your experience level with Photoshop thus far?
  3. What specific things would you like to learn this semester regarding digital media editing?
  4. What are your future career goals, and how can this class help achieve those goals?


Performance of Understanding:

  • My First Blog Post

#2 Formal Email Assignment [10 Points]

This assignment is due by the end of the period

Students will send a mock email (to Mr. LaFata) to ensure that there is effective and efficient communication for future assignments.

When emailing your teacher you must:

  1. Use the subject line with a general description of what your email pertains to, your last name, and class period ex: LaFata Block 4 Digital Media Editing– grade “Formal Email Assignment”
  2. Include a greeting (ex. Good morning, Mr. LaFata)
  3. The body of your message, your question, etc. Do not use text language. You are not texting a friend, so please keep your language and tone professional.
  4. Be Specific! Make sure you include the name of the assignment you are emailing about and exactly what you would like done
  5. Closing message (ex. Thank you for your time. YOUR NAME)

Sample email:

  1. Subject Line:
  • Smith B3 Video Editing– grade “formal email assignment”

2. Greeting:

  • Hello, Mr. LaFata,

3-4. Be Specific:

  • Please regrade my formal email assignment;  I embedded the OneDrive link properly!

5.  Closing:

  • Have a nice day,

Jill Smith

#3 Crop and Straighten [15 Points]

You will have one class period to complete this assignment

This assignment is due by the end of class:

A Day: 1/30/24

B Day: 1/29/24

Please title your post: Cropping and Straightening


Learning Targets:

Students will be able to:

  • open and navigate multiple images in PS.
  • use various cropping methods to save or eliminate parts of an image.

Agenda:

DATA DISC: https://eriesd-my.sharepoint.com/:f:/g/personal/dlafata_eriesd_org/Ehdt6U6UCt9FmV-MY5ctLgEB59p0PZwnqrwcd02joef-SQ?e=DuzMCa

1. Mr LaFata will demonstrate how to open several images at the same time from the DATADISK (File>>Open>>DATADISK>>Editing>>AdobeKnowHow>>Chapter5…(Hold control or shift to open multiple images)>>Open

Chapter 1: Introduction

  • 1-1: “Say Hello to Andy”

https://eriesd-my.sharepoint.com/:v:/g/personal/dlafata_eriesd_org/EXJxkN_m_OpPhxzT6an43wcBWCf2ZVvaMirWokvvZXosKg?e=EarIjv

Chapter 3: Working with PS Images

  •  3-5: Tiling and Scrolling

https://eriesd-my.sharepoint.com/:v:/g/personal/dlafata_eriesd_org/ETn4_xbUpfdAg14dK7C12AcBxPuplro14qBjSouorZ18-w?e=ubAVnr

  • 3-6: Using the Zoom Tool 

https://eriesd-my.sharepoint.com/:v:/g/personal/dlafata_eriesd_org/ES_8n1lA74BBiNpRKN2UYy4B-8V2OrJkxqj1rV5wZIAAog?e=GOUt27

  • 3-8 demonstration of tiling, scrolling, and zooming

https://eriesd-my.sharepoint.com/:v:/g/personal/dlafata_eriesd_org/ESb5SA2L6UBIoHA7mRyga2kB2uYmnmDHdmYk7LT5pSDNjQ?e=kp3UwI

Chapter 5: Cropping and Straightening

***Once you have completed all of the tutorials, tile the images and post them to the blog.

Use an image capturing tool to take a screen shot of your tiled, edited photos.

Use the Microsoft snipping tool to capture your results. This can be found by selecting the windows icon and scrolling down to the windows accessories folder. **You may drag the snipping tool icon to the toolbar on your desktop for quick access.

If using a Chromebook, hold down the control and shift keys then select the switch windows key, this will allow you to capture a portion of your desktop


Performance of Understanding:

  • Cropping
  • Cropping Straighten
  • Perspective
  • Straighten It

Sample Blog Post:

TITLE: #2 Cropping and Straightening


#4 Selections [15 Points]

You will have two class periods to complete this assignment

This assignment is due by the end of class:

A DAY 2/5/24

B DAY 2/2/24

Learning Targets:
Students will be able to:
demonstrate how to use the various selection tools.

Please title your post: Chapter 6 Selections


Agenda:

  1. Open Photoshop and select “Open”
  2. Navigate to DATADISK (File>>Open>>DATADISK>>Editing>>AdobeKnowHow>>Chapter six>>highlight and open all files
  3. Watch the following tutorials:

Chapter 6: Selection
6-1 Chapter Intro (2:00) https://eriesd-my.sharepoint.com/:v:/g/personal/dlafata_eriesd_org/EQjLPo1t029CijmLTFP3bOwB7hBhSPOUQ6MnnYzWtp5qBg?e=AdrjS5

6-2 Selection 101 (2:17) https://eriesd-my.sharepoint.com/:v:/g/personal/dlafata_eriesd_org/EfO1mTyUlLxCqmhVWRY65SoB1IRNvojBZ0vi45MArfh05w?e=QWkQ9b

6-4 Working with the Marquee Tools (10:52) https://eriesd-my.sharepoint.com/:v:/g/personal/dlafata_eriesd_org/ESqNj2fpQ0ZKsvUYBswnuq8Bog19oZSAoh-Bpg9X3STqQQ?e=OWARYu

6-5 Working with Magic Wand and Quick Selection (7:51) https://eriesd-my.sharepoint.com/:v:/g/personal/dlafata_eriesd_org/EdrMq6C2s5BLq_esE1rFOp0BUJNB1zSzEuGfkQ2qV_dkgQ?e=xlBseQ

6-6 Using Grow, Similar, and Inverse (3:57) https://eriesd-my.sharepoint.com/:v:/g/personal/dlafata_eriesd_org/ERlrmod3NoZOsD9QZ2mSIF0BwO4r-I86_IlvSYkGZZh35A?e=m09N17

6-8 Using the Lasso Tools (5:34) https://eriesd-my.sharepoint.com/:v:/g/personal/dlafata_eriesd_org/Eexd-CHr7X9Dp1qQcMF4PFUBMN5rydgbR3YPxRcgGVmVtA?e=qF4b8m

6-9 Using Refine Edge (3:41) https://eriesd-my.sharepoint.com/:v:/g/personal/dlafata_eriesd_org/EWQBtKgPAqVEqx75oa_jnrEBdludLC1tSjgaP5Wohbq72w?e=KMMFDJ

6-11 Selection Conclusion (:39) https://eriesd-my.sharepoint.com/:v:/g/personal/dlafata_eriesd_org/ETEyc_JYs3pOvdA8tiibINMBAjHnb3YII65lTfV3qj7reQ?e=rnlsVh

Note:
Please post a screenshot of the tiled images on your blog.

Performance of Understanding:
CHAPTER 6
Action
Flower
Magic Wand
Pretty Woman
Scanline

Example Blog Post:
Title: Selections


#5 Veggies [15 points]

You will have two class periods to complete this assignment

This assignment is due by the end of class:

A Day: 2/9/2024

B Day: 2/8/2024

Please title your post: Veggies


Learning Targets:

Students will be able to:

use the various selection tools to select areas of an image.

make specific items a layer and place them in the desired location.


Agenda:

Students will independently work through the Veggies practice assignment.

Please pick up the “Working With Selections” handout in class.

To open the file: datadisk>>editing>>adobeknowhow>>chapter 6>>Practice

When they are finished, they will capture a screen shot of their image (with the Snipping Tool) that includes all of the layers and post it to their blog.

The title of the blog post should be “Veggies.”  Please answer the Essential Question below the image.

Each layer should be renamed to suit the object it contains. For example: the layer that contains the image of a carrot should be named “carrot.”


Blog Post Example:

Essential Question:

Which of the selection tools do you prefer and why?

#6 Fictitious Reality Project [25 Points]

You will have four class periods to complete this assignment

Your completed project is due at the end of class on: 

A Day: 2/20/24

B Day: 2/21/24

Please title your post: Fictitious Reality Project


Learning Targets:

Students will be able to independently demonstrate the use of the selection tools by creating an image with themselves and various other objects.


 Agenda:

This is a photo creation of your own choosing, as long as it is school appropriate (i.e. no nudity, weapons, drug and alcohol references).

  1. We will discuss the expectations as a class for the Fictitious Reality Project via the directions/expectations posted on the blog.
  2. Students will create a document that is 16×24 or vice versa for the starting point of their project- set the resolution to 300.
  3. Go to File>>New, then enter the dimensions 16×24 or 24×16, make sure you select “inches” rather than “pixels”
  4. Go to File>>Place.
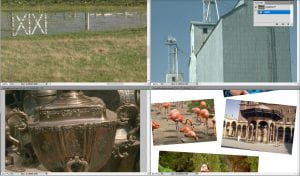
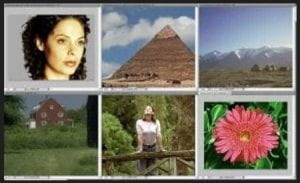
  5. Select the background image you wish to use.
  • Is the photo clear and not pixelated? If so, move on to the next step.
  • Try searching for desktop background images as they are usually saved at a higher resolution.
  • Some images are copyright protected. If you are unable to save the image, try finding another one that is available to download for free.

6. Go to file>>Place and place all of the elements you want to use. They will be placed on their own layer.

OR:

Method 1: Drag and Drop from folder location.

Step 1 – Open Adobe photoshop with the background.
Step 2 – Open the folder of your image located. Drag the image from the folder directly into the Photoshop.
Step 3 – Your image will become a smart object and a layer on top of background will create automatically.

Method 2: Drag and Drop from other photoshop tab.

Step 1 – Open the photoshop with your original background.
Step 2 – Open the image you want to put on top of the background using photoshop. Now there are two tabs inside the adobe photoshop.
Step 3 – At the tab of the image you need to put on top the background, drag its layer and drop at the background tab.

Method 3: Copy and Paste

Step 1 – Open the image you want in photoshop.
Step 2 – Press Ctrl + A at the keyboard to select all the image.
Step 3 – Paste(Ctrl + V) at the background tab where the original background you have.

7. Right click on the layer each layer and select “Rasterize.”

8. To change the size of an object, click on the layer.  Navigate to the top menu bar click EDIT>>FreeTransform.  You can then change the size per your needs.                  When you are satisfied, press ENTER on your keyboard.

You will now use the selection tools to select a HEAD TO TOE shot of yourself as well as your other objects.

9. Save your file as LAST NAME FR.psd

10. When finished, please save your project as a jpeg.

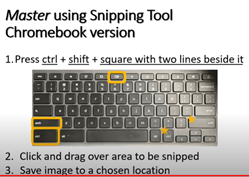
11. Take separate  screen shot of the layers and include it in the same post

12. Title: Fictitious Reality Project

  • You may use any of the selection tools you wish, as long as it works for what you are trying to accomplish. After selecting, you will take your move tool, and drag your selected element to the background image.

Success Criteria:

  • My project has one head to toe shot of myself.
  • My project has a background image.
  • I have placed FIVE other elements that have been “cut” from other photos (i.e., an apple, monkey, car, other people, etc.)
  • My selections are neat and  tidy.
  • My end result looks realistic in terms of the elements looking like they belong (not necessarily the concept.).

Fictitious Reality Rubric

Topic:  You will create a poster sized image depicting yourself in a fictitious reality.

_____/2     Background Image

_____/2     Yourself (Head to Toe/Entire Body)

_____/5       5+ additional items

_____/6        Clean Selections

_____/5         Alignment/Placement of Components

_____/5       Aesthetics (Overall visual appeal)

____/25   Total


Blog Post Example:

Fictitious Reality Project

{INSERT SCREEN SHOT OF IMAGE AND LAYERS HERE}


Performance of Understanding:

  • Fictitious Reality Project and Blog Post

Exemplars:


#7 Text [5 Points]

You will have one class period to complete this assignment

This assignment is due at the end of class

A Day: 2/22/24

B Day: 2/23/24

Please Title your post:  Text


Learning Targets:

Students will be able to:

  • Create various types of Photoshop text with the Photoshop text tools.

Agenda:

  1. We will spend the duration of today’s class exploring Photoshop text together.
  2. Please open the following files from the data disc: Open Data Disc>Edit>Adobe Know How>Chapter #7, highlight and open all files

As we have done in the past please follow along with the instructor.  Watch the first few tutorial videos (you don’t need to mimic these), then please complete and post the following Chapter 7 tutorials:

7-6, 7-7, 7-9

  • 7-1 Chapter Intro (1:16) (watch)

https://eriesd-my.sharepoint.com/:v:/g/personal/dlafata_eriesd_org/EWmhpI-Ii8pPlZlEJiVCPc8BX7mSqqh6NIZJ31d1GSyKHQ?e=oqlcH5

  • 7-2 Photoshop Text 101 (3:45) (watch)

https://eriesd-my.sharepoint.com/:v:/g/personal/dlafata_eriesd_org/ET4SDLSzsjNCh5FkIG0u2HYBfIFZk4QhS_vGQhaFoXd39Q?e=ttBfUo

  • 7-4 Generating and Controlling Area Text (3:28) (watch)

https://eriesd-my.sharepoint.com/:v:/g/personal/dlafata_eriesd_org/ETnPeF6NrGJLsKAxfuBiWf4BWpUyNMQjcaD0C49G-Q87xw?e=9khnJv

  • 7-5 Using the Wrap Text Option (3:46) (watch)

https://eriesd-my.sharepoint.com/:v:/g/personal/dlafata_eriesd_org/ESONBAPZzZdMqigUddU6rUcBS-UdYLj5T0eW3eqzYCX2Pw?e=doogg9

  • 7-6 Placing Text on a Vector Path (3:54) (complete)

https://eriesd-my.sharepoint.com/:v:/g/personal/dlafata_eriesd_org/EZCk8owcdEhGvPYOqubelG4BeswiHqIFyuD6CpNP0XshQA?e=3guMih

  • 7-7 Generating Wire Text (4:17) (complete)

https://eriesd-my.sharepoint.com/:v:/g/personal/dlafata_eriesd_org/ES509vF2d69IvXVeAmSZsyEB_X_dsbhK04tXuEGj7K-PwA?e=PK7m1z

  • 7-9 Beveled Text With a Twist (4:18) (complete)

https://eriesd-my.sharepoint.com/:v:/g/personal/dlafata_eriesd_org/ET0R-Tr5IqZFtV5Ge9gNYE8BoEBEqGBaoa5XLqn1uIwqhA?e=AwP0Ho

  • 7-10 Photoshop Text Conclusion (:47)

https://eriesd-my.sharepoint.com/:v:/g/personal/dlafata_eriesd_org/Ef6NlKrhJq5Okf8vcGxhHoQB3BMzg5_qHX50NMJQQsxDWg?e=S3mV1m

Example Blog Post:

Title: #13 Text


Performance of Understanding:

  • Beveled Text
  • Text on a Path
  • Wire Text

#8 Independent Text Projects X3 [30 Points]

Text Project #1 Due:

A Day 2/26

B Day  2/27


Text Projects #2 Due: 

A Day 3/1

B Day  3/4


Text Project #3 Due:

A Day 3/5

B Day  3/4


Please submit three separate posts with the following titles: “Independent Text Project 1 {Insert Name of Tutorial Here},”  “Independent Text Project 2 {Insert Name of Tutorial Here},” and “Independent Text Project 3 {Insert Name of Tutorial Here}.”


Learning Target: Students will independently complete THREE PS text tutorials of their choice.


 Agenda:

Photoshop can be a powerful tool that professionals can use to create powerful works of art.  These pieces can appear complex, but with knowledge of Photoshop and a well-written tutorial, they can be created by students and those who are in the beginning or intermediate stages of their careers with great success. You will use the internet to locate THREE text based tutorials that are of interest to you.

If you can answer “yes” to the following, you may proceed with completing your tutorial:

  1. Is the focus of the image text?
  1. Is it different from the exercises and projects we have done in class?
  1. Does the tutorial use Photoshop and not another Adobe product (i.e., InDesign or Illustrator)?
  1. Did you read over the directions?
  1. Can you understand them?

Please Note:

Disregard the size requested by the tutorial.  Instead, make your document 10 inches by 8 inches. You may select the colors, fonts, etc. of your choice. The tutorial must be your first, middle, last name, or any combination of the three… NOT the word that is in the tutorial.

When DONE:

  1. If you can answer “yes” to the following questions, you may do a screen shot of your image with the layers palette, and post to your blog (individually):
  • Does the text contain your real first or last name or both?
  • Is it creative?
  • Is it neat?
  • Did you put forth your best effort?
  1. Additionally, you will need to fully answer the questions below for EACH project using complete sentences.

Blog Post Example:

Independent Text Project 1: {Insert Name of Tutorial Here}

{INSERT SCREEN SHOT OF IMAGE AND LAYERS HERE}

{INSERT LINK TO THE TUTORIAL HERE}

Essential Question(s):

  1. What new skills did you learn?
  1. Describe the process used to create the image. Please write a summary in complete sentences.  DO NOT RELIST THE STEPS.  I want to know that you understand what you are going to be doing.
  1. What did you enjoy most about the text tutorial you chose?
  1. What did you like the least?
  1. What would you do differently if you had to repeat the tutorial?

Performance of Understanding:

  • Independent Text Project 1
  • Independent Text Project 2
  • Independent Text Project 3

Rubric for each project:

  • completed tutorial picture: 2 points
  • layers: 3 points
  • tutorial url: 2 points
  • questions answered in complete sentences: 3 points

TOTAL: 10 points


RESOURCES:

50 Best Photoshop Text Effect Tutorials

https://www.creatisimo.net/photoshop-text-effect-tutorials/

#9 Text Based Poster [17 Points]

You will have three class periods to complete this project

****Completed Text Based Poster is due:

B Day 03/14/24

A Day 3/13/24

Please title your post: Text Based Poster

Learning Targets:

  •  Create a text focused poster using Photoshop skills and knowledge.

 Agenda:

  1. Students will create a document that is 300 resolution and 16×24 (or vice versa) for the starting point of their poster.
  2. When finished, please save a jpeg image of your completed poster as well as a separate screen shot of your layers. Please embed both images to the same post.  Title:  Text Based Poster

Please Note:

  • The poster must be for a fictitious band.
  • It must include the following information: band name, event location, time, date, website, and cost, as well as any additional information you feel is important.

Success Criteria:

  • My poster includes a variation of five different styles of text.
  • The text in my poster includes 3 or more colors.
  • My poster includes 3 or more graphics/images.
  • The alignment/placement of objects in my poster is appropriate.
  • I have created a poster that has a good overall visual appeal.

Text focused POSTER  Rubric

Topic:  You will create a concert/event poster for a fictitious band.

_____/5     5+ Different Text styles (Consider: effects, text on path, etc.)

_____/3       3+ colors (in terms of text)

_____/3        3+ Graphics/Images

_____/3         Alignment/Placement of Components

_____/3       Aesthetics (Overall visual appeal)

____/17   Total


Blog Post Example:

#14 Text Based Poster


Performance of Understanding:

  • Poster Project and Blog Post

#10 Chapter 8 Brushes [10 Points]

You will have two class periods to complete this assignment

This assignment is due by the end of class:

A Day: 3/19/24

B Day 3/20/24

Learning Targets:

Students will be able to:

  • demonstrate the use of the various brushes in Photoshop.

Please Title your post: Chapter 8 Brushes


Agenda:

  1. We will spend the duration of today’s class exploring Photoshop brushes together.
  2. Please open the following files from the Datadisk (Editing>>Adobe Know How>>Chapter 8):

2.  Complete the following Chapter 8 tutorials:


Performance of Understanding:

  • Art Palette
  • Girl on Grass
  • History